
Introduction:
This is a paragraph.
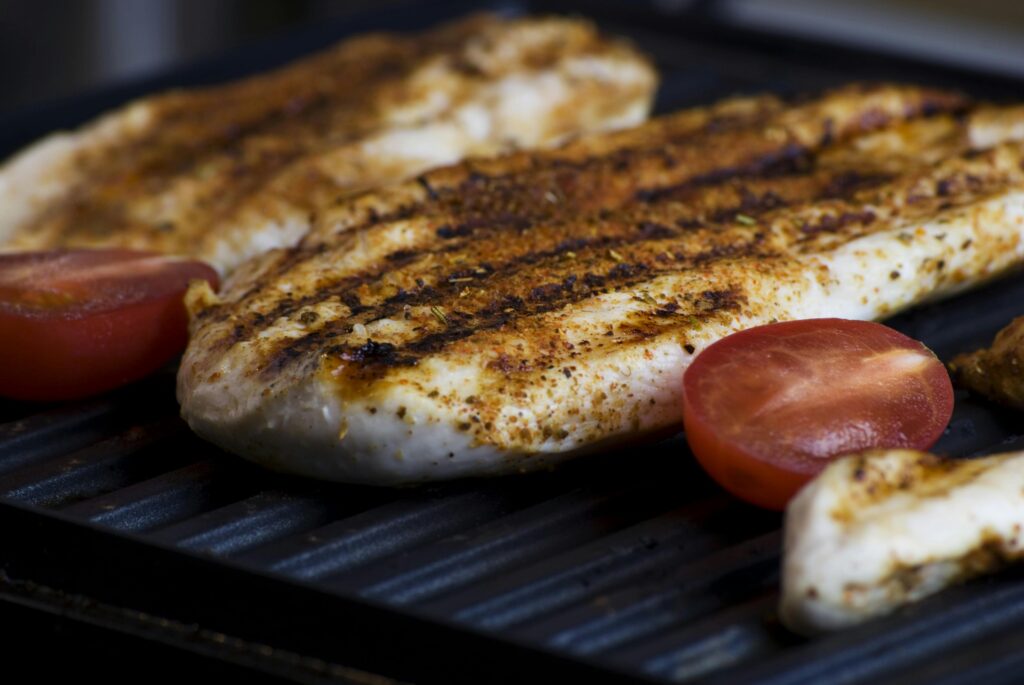
A 4oz serving of grilled chicken breast packs 26g of protein while containing just 120 calories, making it ideal for sustainable weight loss.
Preparation Techniques
Let me share my journey with grilling chicken – this is something I’ve really fine-tuned after years of serving both successes and, well, some pretty questionable birds to my family!
Let’s dive into marinades that won’t turn your chicken into a sugar bomb. My absolute favorite is a Mediterranean-inspired blend: 1/2 cup extra virgin olive oil, 1/4 cup lemon juice, 4 crushed garlic cloves, and fresh herbs like oregano and thyme. I discovered this combination after getting frustrated with store-bought marinades that were basically sugar syrups! Another winner is a yogurt-based marinade with 1 cup plain Greek yogurt, 2 tablespoons olive oil, lemon juice, and minced garlic – it makes the chicken incredibly tender without any added sugars.
When it comes to seasoning chicken, I’ve learned that less is often more. My foolproof blend includes 1 tablespoon each of kosher salt and paprika, 2 teaspoons garlic powder, 1 teaspoon black pepper, and 1 teaspoon dried oregano. I once went overboard with a 12-spice blend that completely overwhelmed the chicken’s natural flavor – lesson learned! Pro tip: always pat the chicken dry before applying seasonings, otherwise they just slide right off during cooking.
Trimming chicken properly used to be my nemesis until I figured out a systematic approach. Start by removing any excess fat deposits, especially around the cavity if you’re working with whole chickens. For breasts, look for and remove that white tendon – it gets super chewy when cooked. I keep a dedicated pair of kitchen shears just for this job because they make the work so much easier than struggling with a knife.
Now, let’s talk about brining – this was seriously a game-changer for my grilled chicken game! The basic brine ratio I use is 1/4 cup kosher salt and 1/4 cup coarse ground black pepper per quart of water. Add a couple of smashed garlic cloves and some fresh herbs if you’re feeling fancy. I learned through trial and error that 2-4 hours is the sweet spot for chicken pieces – any longer and they can get too salty. For whole chickens, 4-6 hours works perfectly.
Temperature control is absolutely crucial for chicken. After serving some embarrassingly pink pieces at a family barbecue years ago, I invested in a good meat thermometer – best grilling decision ever! Set up your grill with two temperature zones: one side hot (around 400°F) for searing, and one side medium (around 350°F) for cooking through. Chicken breasts need to hit 165°F internal temperature, while thighs are better at 175°F for tender meat.
Here’s something specific I discovered: placing a pan of water on the cooler side of the grill helps maintain moisture and creates a more even cooking environment. The steam helps prevent the dreaded dry chicken syndrome we’ve all experienced. I also keep a spray bottle filled with apple cider vinegar mixed with water (1:3 ratio) for occasional spritzing – it helps develop a nice crust without drying out the meat.
When grilling chicken pieces, start them skin-side up on the cooler side for about 15-20 minutes, then move them to the hot side skin-down for 5-7 minutes to crisp up. This reverse-sear method has given me the most consistently juicy results with perfectly crispy skin. I used to do it the other way around and ended up with burnt skin and undercooked centers more times than I’d like to admit!
Remember, patience is key with chicken. It’s better to take your time and get it right than rush and end up with either unsafe or dry meat. Trust me, I learned that one the hard way!
Portion Guidelines
Let me share what I’ve learned about portion control and protein planning through years of meal prepping and, honestly, making every portion-related mistake possible!
I used to eyeball my portions until I realized I was consistently overestimating serving sizes. Here’s what actually works: for most adults, a proper serving of meat should be about 3-4 ounces cooked – roughly the size of a deck of cards. I keep an actual deck of cards in my kitchen drawer as a visual reference (yeah, I’m that person now!). For those really active days or if you’re building muscle, you might go up to 6 ounces, but that’s definitely plenty for one serving.
Speaking of protein requirements, this is where I see a lot of confusion. Through working with various nutrition experts, I’ve learned that most adults need about 0.36 grams of protein per pound of body weight daily. So for someone weighing 150 pounds, that’s about 54 grams of protein per day. Here’s a practical breakdown I use: a 4-ounce serving of chicken breast provides roughly 25-30 grams of protein. When I first started tracking this, I was shocked to realize I was actually getting way more protein than I needed!
Timing your protein intake throughout the day makes a huge difference. I’ve found spreading it across three main meals works best – you want about 20-30 grams per meal for optimal absorption. I learned this the hard way after trying to load up all my protein at dinner and feeling uncomfortably full. Your body can only efficiently process so much protein at once, typically around 25-35 grams per meal.
Let’s talk about weekly consumption guidelines. While protein is important, variety is key. The American Heart Association suggests limiting red meat to 1-2 servings per week. I organize my weekly menu with 2-3 servings of fish (especially fatty fish like salmon), 2-3 servings of lean poultry, and maybe one serving of red meat. This approach has really helped balance nutrition while keeping things interesting in the kitchen.
Storage guidelines are crucial – I learned this after having to throw out way too much expensive meat! Raw meat should never stay in the fridge for more than 2 days before cooking. If you’re not planning to use it within that window, pop it in the freezer right away. Here’s my time-tested storage guide: ground meats last 3-4 months in the freezer, whole pieces like chicken breasts or steaks can go 4-6 months, and cooked meats should be eaten within 2-3 months.
For fridge storage, always use the bottom shelf to prevent any potential drips from contaminating other foods – a lesson I learned after a messy incident with a leaky package. Cooked portions will last 3-4 days in the fridge, but I always do the “sniff test” before eating. If there’s any doubt, throw it out! Trust me, food poisoning isn’t worth the risk of saving a few dollars.
Temperature control during storage is super important too. Your fridge should be set at or below 40°F (4°C). I keep a thermometer in there just to be sure, because I once lost a whole week’s worth of meal prep when my fridge was running warmer than the display indicated. For frozen storage, you want 0°F (-18°C) or below to maintain quality and safety.
The biggest lesson I’ve learned about portions and storage? Having a plan makes all the difference. I now prep and portion my proteins as soon as I get home from the store, which has virtually eliminated waste and makes meal planning so much easier throughout the week.
Best Cooking Methods
Let me tell you about my grilling journey and share some hard-learned lessons about cooking methods. After years of experimenting (and yes, serving some pretty questionable meals), I’ve finally nailed down the techniques that consistently work.
The whole direct versus indirect heat thing used to confuse the heck out of me. Here’s what I’ve figured out: direct heat (right over the flames) is perfect for thin cuts under 1 inch – think burger patties or chicken cutlets. They need that quick, hot sear to develop flavor without drying out. For thicker cuts like chicken breasts or a tri-tip roast, indirect heat is your best friend. I set up my grill with coals on one side and leave the other side empty, creating distinct temperature zones. This two-zone setup has saved countless meals from becoming charred disasters!
Temperature monitoring was a game-changer for me. After serving an embarrassingly pink chicken at a family barbecue (sorry, Aunt Linda!), I invested in two thermometers – one for the grill temperature and a good probe thermometer for the meat. Here are the target temperatures I swear by now:
– Chicken: 165°F (75°C) at the thickest part
– Medium-rare steak: 135°F (57°C)
– Pork: 145°F (63°C) with a 3-minute rest
Speaking of doneness indicators, please don’t rely on the “cut and peek” method like I used to! That just lets all the juices escape. Instead, I’ve learned to use touch and temperature. The palm test has been super reliable – when you touch the base of your thumb to each finger, the firmness of the palm muscle matches different levels of meat doneness. But honestly, the probe thermometer is still your most accurate friend.
Moisture retention was my biggest challenge until I discovered some key techniques. First, always let your meat rest at room temperature for 20-30 minutes before cooking. I can’t tell you how many times I threw cold meat straight on the grill and wondered why it cooked unevenly! Also, resist the urge to constantly flip the meat – I used to be a chronic flipper until I realized I was just losing moisture every time. Let it sit and develop a nice crust.
Now, let’s talk food safety because this is crucial. Cross-contamination was my nemesis until I developed a system. I use separate cutting boards and utensils for raw meat, and I keep a spray bottle of diluted bleach solution (1 tablespoon per gallon of water) to sanitize surfaces. The temperature danger zone is between 40°F and 140°F (4°C-60°C), and I try to limit meat’s time in this range to under 2 hours.
One mistake I made early on was thinking that if the outside looked done, the inside must be too. Big mistake! Thick cuts especially need time to cook through properly. I now use the reverse sear method for these – start with indirect heat to cook the interior, then finish with direct heat for that beautiful crust. This approach has given me the most consistently good results.
Remember that carry-over cooking is real – the internal temperature will rise about 5-10 degrees after you take the meat off the heat. I learned this after overcooking countless steaks! Now I pull them off a few degrees below target temperature and let them rest under loose foil for 5-10 minutes.
The most important thing I’ve learned? Patience is key. Rushing the cooking process never ends well. Take your time, monitor your temperatures, and respect the resting period. Your taste buds (and your guests) will thank you!
Meal Planning Strategies
Let me share my experience with meal planning and prep – an area where I’ve definitely learned some lessons the hard way!
Batch cooking is a total game-changer, but it took me a while to get it right. Here’s my foolproof strategy: I cook 3-4 pounds of protein at once, usually on Sunday afternoons. For chicken, I’ll prepare it two different ways – some grilled with a basic seasoning (that versatile salt-pepper-garlic blend I mentioned earlier) and some with a more specific flavor profile like Mediterranean or Mexican-inspired seasonings. This gives me flexibility for different meals throughout the week. One time I made the rookie mistake of cooking everything with the same teriyaki sauce – by day three, nobody wanted to see another teriyaki dish!
Storage is crucial for keeping your batch-cooked meals fresh and appetizing. I invested in some good quality glass containers with compartments, and it’s been worth every penny. Here’s my system: portion out the cooked protein into 4-6 ounce servings right after cooking (while it’s still warm). Let them cool completely before putting the lids on – I learned about condensation the hard way when some perfectly good chicken got slimy after I sealed it too soon. For freezer storage, I use vacuum-sealed bags and lay them flat to freeze – this saves space and prevents freezer burn.
When it comes to reheating, moisture is key. I keep a small spray bottle filled with chicken broth in the fridge. Before reheating, I give the meat a light spritz – this prevents that dreaded dry, rubbery texture. For microwave reheating, I use 50% power and heat in 30-second intervals. The stovetop method works great too – just add a tablespoon of liquid to a pan, cover, and heat on low. The steaming effect helps restore moisture.
Let’s talk about combination ideas because eating the same thing gets boring fast! I prepare “protein packs” with different complementary ingredients. For example, I’ll cook chicken with Mediterranean seasonings and pack it with quinoa, roasted vegetables, and a lemon-tahini sauce on the side. Another favorite combo is Mexican-spiced chicken with black beans, roasted corn, and lime-cilantro rice. The key is having these components ready to mix and match.
Prep scheduling was tricky to figure out at first. Now I have a system that works like clockwork. Saturday morning is for planning and shopping. Sunday afternoon is my main prep time – I aim to start by 2 PM so everything’s done before dinner. I organize my prep in stages:
1. Start marinades and brines first thing
2. Chop all vegetables while meat is marinating
3. Get grains cooking while proteins are on the grill
4. Cool and portion everything while grains finish cooking
One game-changing tip I discovered: prep “emergency proteins” for the freezer. These are individually wrapped portions that are already seasoned and ready to cook. They’ve saved me countless times when my weekly prep didn’t go as planned or when unexpected guests showed up.
The biggest lesson I’ve learned about meal planning is to be realistic. I used to prep huge amounts of food thinking I’d eat the same thing all week, but variety is important for staying on track. Now I prep two different protein options and make sure they can be used in at least three different ways each. This flexibility has made a huge difference in sticking to my meal plan.
Remember, a good meal prep system takes time to develop. Start small, find what works for you, and build from there. And always, always label your containers with dates – trust me, playing “guess how old this chicken is” is not a fun game!
Common Mistakes
Let me share some hard-learned lessons about meat preparation mistakes that I’ve encountered (and hopefully help you avoid them)!
The biggest mistake I see with overcooking is something I battled with for years – the dreaded “just a few more minutes” syndrome. You know what happens? The protein strands tighten up so much that they actually squeeze out all the juices, leaving you with meat that’s got the texture of shoe leather. I remember hosting a dinner party where my chicken breasts ended up so dry, my guests kept reaching for their water glasses! The solution I’ve found is simple: invest in a good meat thermometer and pull your meat off the heat about 5 degrees before it hits the target temperature. It’ll continue cooking during the rest period.
Marinade mistakes nearly ruined several family dinners before I figured things out. The worst offense? Using a marinade with high sugar content for too long. The sugars start breaking down the meat’s surface proteins, leaving you with a mushy exterior that burns easily. I now limit acidic marinades (like those with citrus or vinegar) to 2 hours max for chicken and 4 hours for beef. And here’s something I learned the hard way: never, ever reuse marinade that’s touched raw meat – even if you think boiling it will make it safe!
Cross-contamination is sneakier than you’d think. I used to prep my salad on the same cutting board right after trimming chicken – yikes! Now I have a color-coded system: red boards for raw meat, green for vegetables, and white for cooked foods. Also, those kitchen towels you wipe your hands on while cooking? They need to be changed way more often than you think. I keep a stack of clean towels ready and swap them out whenever I switch between handling raw and cooked foods.
Temperature errors aren’t just about cooking – they start with storage. My biggest facepalm moment was leaving marinated chicken on the counter to “come to room temperature” for way too long. The safe zone is 20-30 minutes max, not the two hours I let it sit that one time! And don’t get me started on the importance of proper fridge temperature. I once lost a whole week’s worth of meal prep because my refrigerator was running at 45°F instead of the required 40°F or below.
Storage issues can turn perfectly good meat into a science experiment if you’re not careful. The most common mistake I see (and made plenty of times myself) is putting hot meat directly into storage containers and sealing them up. This creates condensation that leads to bacterial growth. Now I always let meat cool for about 30 minutes before packaging it up. But don’t let it sit out longer than 2 hours total – that’s just asking for trouble!
Speaking of storage, here’s a costly lesson I learned: those grocery store foam trays aren’t meant for long-term storage. I used to just throw them straight in the freezer, then wonder why my meat had freezer burn three weeks later. Now I either vacuum seal or double-wrap in plastic wrap and foil if I’m planning to freeze anything for more than a few days.
The weirdest mistake I discovered? Using metal containers for marinating. The acid in marinades can actually react with metal, giving your food a funky metallic taste. Ask me how I know! Stick to glass, ceramic, or food-grade plastic containers for marinating.
One final temperature error that used to get me: not letting the grill or pan preheat properly. You want that initial sear to lock in the juices, but a lukewarm cooking surface just leads to gray, steamed-looking meat instead of that beautiful brown crust we’re all after. Give your cooking surface at least 10-15 minutes to heat up properly before you start cooking.
Remember, most of these mistakes come from rushing or trying to take shortcuts. I’ve learned that when it comes to meat preparation, patience really is a virtue – and it’s usually the difference between a mediocre meal and a memorable one.
Conclusion:
Aim for 4-6oz portions of grilled chicken breast, prepared with minimal added fats and sugars.